Sunday, May 14, 2017

Debbie Caillet's Final Project

I am so imbedded in public education, especially elementary, that it is difficult for me to remember the art world outside my busy classroom. Having taught elementary art for twenty years, I have thought of nothing else in those quick years. My mind is so in tune with their thoughts, abilities, needs, and what they are capable of I seldom think of art on any other level. I guess you can say I have given my students every ounce of passion for the arts I possibly could share with them. So it seemed befitting to me to naturally include them in the process of my semester project. I value their expressive line, their spontaneity, and their unabashed approach to creating art. While I originally planned to focus on my first love: bookmaking, I was inspired by another culture’s art making and decided to marry two styles of art making together: Mud Cloths and Quilting
African Mud cloths are rich in tradition of the Malian culture of Africa. Bogolanfini is the correct term for mud dyed cloth. Essentially the men weave the fabric and the women dye the fabric in a bath of leaves to prep the fabric. Then a series of fermented mud layers are painted one at a time to create a pattern. The layers become darker and darker. The fabric is then washed and the opposite areas are bleached white. I discovered the men are the mud cloth makers but it is still mostly the women who make sure the tradition is handed down to their daughters and sons. There is something about this time honored craft that reminded me of the American tradition quilting. Early on quilting, Latin for stuffed sack, was a resourceful way to stay warm on chilly nights and it was not long before women put effort into designing blocks and became skilled craftsman. Quilting was then taught to the daughters and handed down to future generations becoming a family heirloom.
Both are similar in their use of fabric, creation of pattern and worked by hand, but I found a deeper connection after some research and reflection. Both fabrics’ similarities are parallel in time and place. I found the words protection, historical significance, community describing the foundation these two cultures shared with their fabrics. I wondered what the textiles of other cultures were. Did every culture place significance on a fabric and elevate it to the status of fine craft? I am reminded of Austrian artist Gustav Klimt who created many paintings representing the family cloth or quilt. Like the Malians who wore the cloth as protection when hunting, Klimt’s quilt represented a protection from sickness and death. Both cultures came to hold their fabrics with highest regard and used them as a symbol of status, skill, and eventually fine art. As time progressed, skilled artisans emerged combining colors and patterns for their inherent beauty creating a common visual language of design.
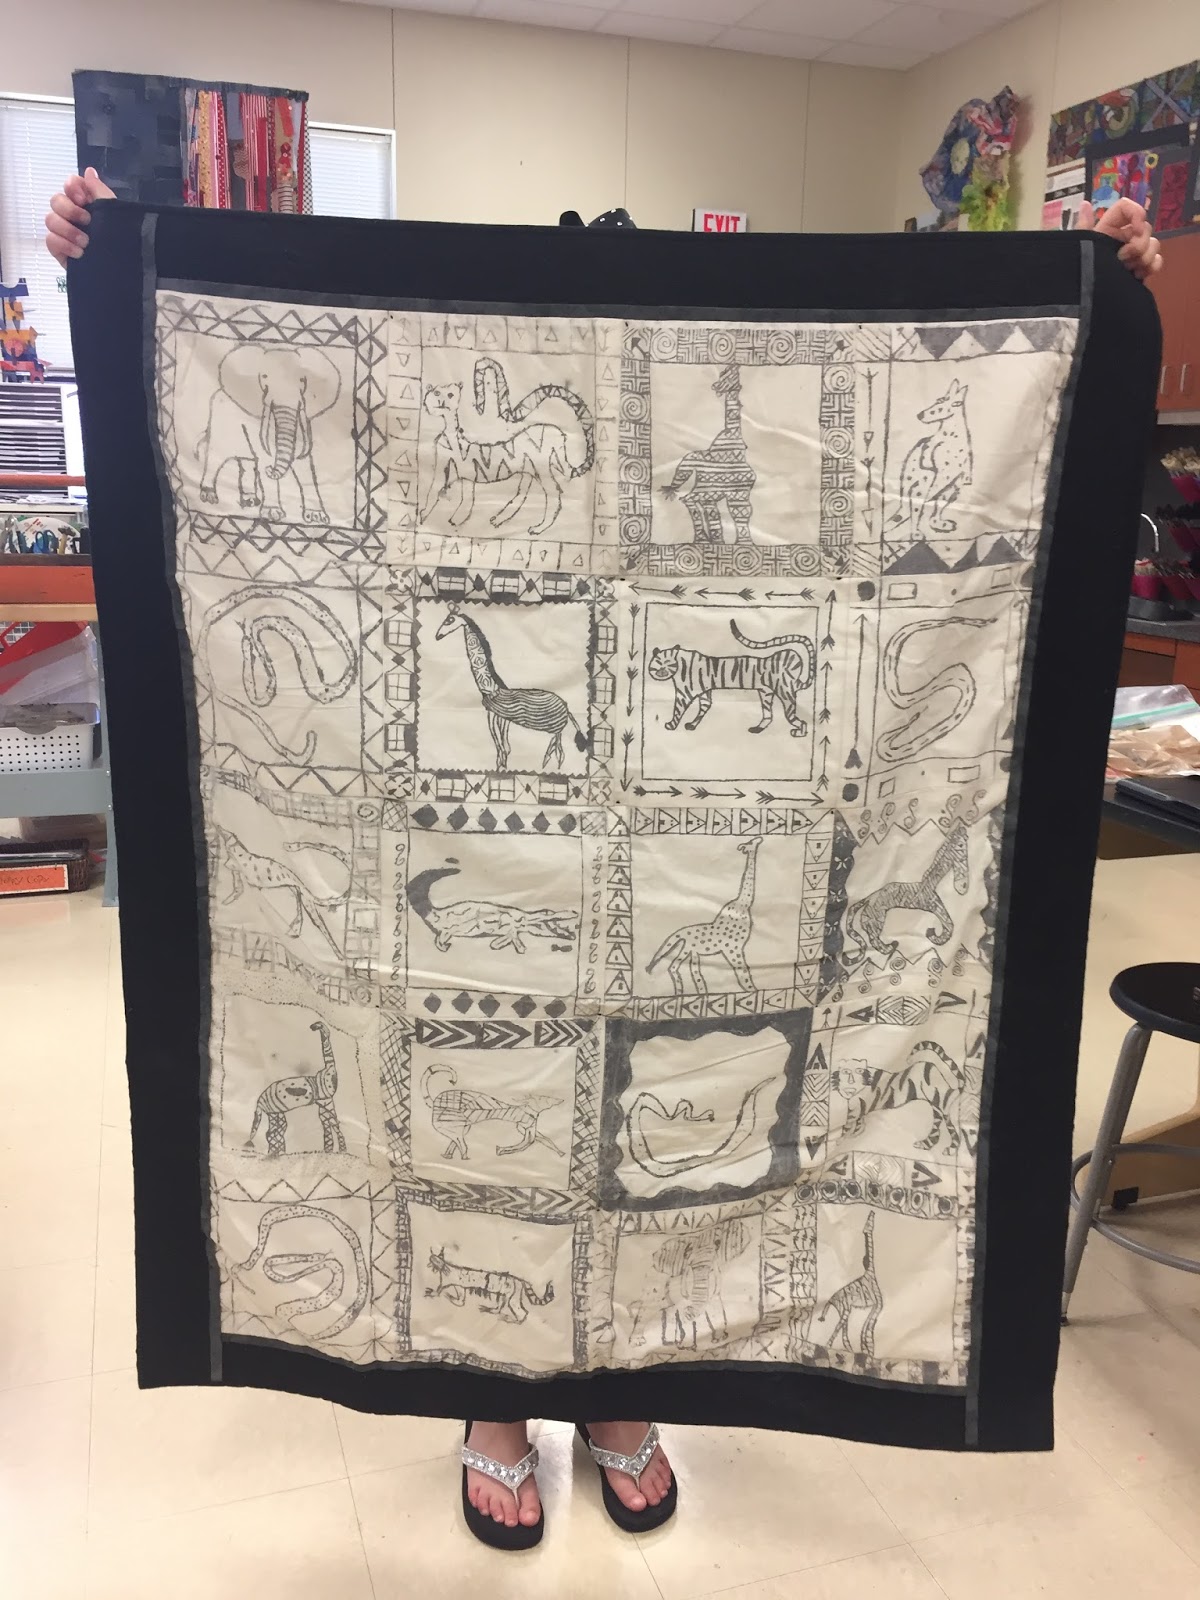
After studying mud cloths and the line designs and symbols of the Mali, my students chose to draw an African animal. They used many of the symbols and patterns used by the Malians. We used clay slip as mud and I added a little blue and black paint to give it a darker look. Using toothpicks and broken paintbrushes the students painted their designs on muslin fabric.  In the next phase, students discovered American quilt making through books, online photos, and PBS series on the Gee Bend quilters. I told my students that we would be creating a tufted quilt design using their mud cloths as the central theme and that I would quilt the border with my sewing machine. Our quilt would be a collaborative wall hanging.
I chose a tufted quilt design because I did not feel right sewing over their art on the muslin. First, we laid out each piece and worked together to choose the best place for each animal. I pinned each into a row and sewed the rows together. I selected a black fabric with a grey swirl pattern to give a little decoration since the muslin was so simple. I edged it in flat black. Quilting on my sewing machine at school is easier since it is a new machine with many features but since I am not a skilled quilter, I still had challenges because I was not quilting over the animals- just the border. I eventually got into a rhythm on the machine and although my stitches are not consistent I felt I did a decent job in all. It is a little wrinkled from taking it home to quilt. I am going to try to steam it carefully.  

Meaningful discussions between students about our journey in discovering, learning, and working together to create a communal work of art help them realize that not all art is singular in nature. Art can be valued, appreciated, created, and shared together.


Diana's Final Project - Crewelwork

Arts and Crafts in America 
Spring 2017 
Craft Project 

I have such fond memories of family and craft from my childhood.  So much of the female conversation and time spent together on my Dad’s side of the family was accompanied by needlework of some kind.  My grandmother did crochet, and my aunts were always involved in either needlepoint, crewel, or cross-stitch.    My aunts shared their knowledge with me and I was involved in this craft from about age 12 forward.    
In my first year of college, I connected with some art students, and I began creating my own needlework designs for gifts for friends and family.  I continued doing this for quite some time into my 20’s and early 30’s.  Then life got busy with other goals and responsibilities, and I stopped working with this medium.   
This class brought all of those memories and experiences rushing back, and I realized that I had wanted to work in the needlework crafts again.  I have some needlepoint projects from years past which were never finished.  In addition, some that were finished but never framed.  Therefore, I am more motivated to complete these projects from the past. 
When I began to think about what project I wanted to do, I was simultaneously cleaning out my garage in preparation of a move.  I found some things from childhood, and even a crocheted vest that my grandmother had made for me when I was about six.  I also found some of my art from elementary school.  My first idea was to create something from either my childhood or my daughter’s childhood.  I kept leaning towards my own though.  This train of thought caused me to decide on the cloth of denim for the surface of my work, which is representative of the sixties decade.  I was also interested in The Makers book to find out that denim made it's way into America by means of a curious woman doing needlework! 
My main idea was to get back into needlework and to refresh my memory on the different stitches and ways to work.  I found some Persian yarn from decades ago, and I bought some needles, and found my Stitchery book.  I also used google and did a little research first through the internet and at JoAnne’s Fabric store.    
My idea evolved into creating some kind of sampler.  I did not want to plan too tightly and just wanted to experience the medium again.  I was hoping to re learn some different stitches that I used to have memorized.  The first stitches were not planned at all.  In addition, the stitches reminded me of fireworks, which made me think of my son’s July birthday.  Truly, the project idea evolved from some associative thinking.  My denim piece was large enough to accommodate 12 circles.  I thought that I would begin with July fireworks and work my way around the calendar with sample stitches, and seasonal themes.  I want to complete the circles with a kind of abstract representation of the month of the year that I am sewing.  Circles represent time, eternity, and wholeness to me.  A kind of completeness, in the cycles of life – and I like the way that the repetition of the circles look on the denim. 
When I complete this, it will make a nice size “throw” if I finish it by quilting the piece.   I was also thinking of future grandchildren – and something for them to cozy up with while learning the months of the year and the seasons of the year.  That is a future thought though – I am not a grandparent yet.   
My first challenge was threading the needle!  Seriously – this was a problem.   My eyesight and my finger dexterity is not what it used to be – I am in my fifties – and aging is not for the faint hearted!  I bought several kinds of needles, and still was having issues.  Until, I humbled my pride and went to JoAnne’s Fabrics and asked for help.  I had even tried to use those “needle threaders”, and had watched a YouTube video – still with no success.  A kind older woman at the store showed me how to use a cut up and folded post it note to solve my issue of getting the yarn threaded through the needle!  Eureka!   Then I was off to be able to work on this project.  I did some research and found that a darning needle would best fit my needs for the crewelwork.   
I have not completed as much as I had hoped to by the end of the course.  Cleaning, remodeling, painting a house, and moving my kids and me to a new place for the whole month of April and into May, interfered with my progress.   
I am going to stick with the idea of the 12 circles representing the 12 months of the year, and viewing this as a sampler.  I have never quilted before – my only experience with quilting came from finishing an edge of a postage stamp quilt that was handed down in the family.   I have an aunt that can help me with the quilting part in the future.   My goal was to complete as many circles as possible during the course of the class.  My eldest daughter and son in law just bought their first home – and it is a beautiful four bedroom on a half-acre of wooded land.  They are planning on children – maybe more than I realized!  Therefore, my hope is to have this project completely finished and ready for the first grandchild! 

 
Working at the old house

Beginning stitches

Fireworks in July

Working in our new home!
Second circle represents Water in August


Saturday, May 13, 2017

James's Final Project

Crafting Rhythms

About eighteen years ago, I hand carved three drum shells from reclaimed willow wood. I was living in Arlington, Texas and had taught art for about four years. Prior to becoming an art educator, I drummed for various bands in Waco and Austin. Being a new teacher, husband and father did not allow much time for a band, so I began playing hand drums. Through happenstance, I was contacted by a man who told me that he had seen my paintings in a gallery. He was also an artist and wondered if I would like to meet and talk. The man was from Nigeria and was a drummer. We became quick friends. After he helped me repair a talking drum I owned, I became determined to create my own drum. The process was labor intensive and somewhat technical, but in the end I had three different sounding drums. Around that time, I purchased a set of Moroccan bongos, which are ceramic with natural skin heads. Since then I have wanted to make a ceramic darbuka drum. Now that I had a potters wheel and kiln access, I was ready to make one.
I made a simple sketch of the drum shell that I wanted to create. I was not too concerned with decoration at first, but I wanted to make sure that the form was pleasing and that it produced a good sound. Darbuka's need to make a deep bass (DOUM) and a sharp treble strike (TEK).
I had not thrown a large form in a while and misjudged the amount of clay needed to pull the shell in one piece. I decided to create the upper bell and the lower cylinder separately and then combine them. It worked out well, and I ended up with a shell that had the basic size and proportions that I wanted.


There are many different traditional styles of goblet drums with ornamentation varying from simple color to elaborate patterns and inlay designs. I found myself leaning towards a more austere surface, using blue and black glazes to echo the shells structure and a loose, lavender glaze to contrast and incite feelings of improvisation.


Traditional darbukas have a goat skin drum head, so I purchased a 14 inch skin from Amazon to cover my 9 in diameter drum shell. The extra skin is needed to gather and tighten the head. Applying the head was the most time consuming part of the creation process. The skin had to be soaked in order for it to be pliable. During soaking, I prepared the cord, which is used to secure and tune the drum. The cord was three parts, a bottom ring of knotted loops, and a two part top system where one ringed cord holds the skin in place while a second pushes them down over the ceramic shell. Between the top and bottom a very long cord is strung through holes I punched in pairs around the skin. It travels down over the top cord, then to one of the bottom loops and back to the next punched pair. The process is repeated for each of the twelve knotted loops. Once all of the loops are connected, the slack is taken and the drum head is made taut. 


After tying the cord off, and braiding the extra to create a handle, the skin is allowed to dry overnight. I played the finished darbuka for several days, trying to find all of its voices and to decide if it needed further tuning. The drum had a good ringing bass and treble sound, plus various effect depending on how the head was struck or muffled. Overall, I was very pleased with the visual and functional character of the drum.


Having created something that is both visually exciting and useful is an powerful experience for me. The coursework of our craft class has helped me understand, through the history and struggles of other makers, why I am drawn to craft-work. The Makers book has given me a fuller knowledge of craft and its possibilities. As an artist, I have honed my resolve to explore those possibilities and as an educator, I will work to endear artistic and functional crafting to my students.

Friday, May 12, 2017

Final Project

Why did a choose knitting? Knitting was something that I had always wanted to try but always felt that it was too difficult to do and that it was too “girly” for a guy to do. Yes, knitting is hard to do because you must learn hand movements, how to hold your needles, the pattern and the knit stitch, and how much tension to put on the yarn, as your knitting it. It’s funny that I thought of knitting a female oriented craft when I have always been interested in fashion; which is a female dominated industry.

In Makers, I was very much interested in the textile and jewelry and metalsmithing sections of the book. I became very much inspired by the artist in chapter 8. I especially was inspired by Sheila Hicks. I want to try my hand at creating small scale textile art. I am limited by the fact that I live in Korea and don’t know if I will be staying here past this year.

Back to the question. I choose knitting because it is something that is very portable and I don’t need any specialized tools or equipment. Everything that I have can be packed into a suitcase when I moved. Also, I would be creating things that are usable and I could make for myself or the people in my life. Another reason is that I could find all my tools or materials in my city or order them from online.

While living in Beijing my friend Mike approached me about wanting to learn to knit also. So, we went to YouTube and started looking at knitting tutorials. After learning what tools, we would need and such as which size needles and yarn are good for beginners; we had his boyfriend order us yarn and I found the needles that we would need. This almost didn’t get done while in Beijing because of Chinese New Year, everything was back logged from the delivery companies being shut down that entire week and then they sent the yarn to wrong address.  We eventually got the yarn a week before we were both supposed to leave Beijing.

Once everything was in order we went to a café and started practicing how to cast on and then working on the knit stitch and how to hold and control the yarn. YouTube is great but it doesn’t answer all your questions, but our friend Jacques’ boyfriend at the time had been taught by his grandmother when he was younger how to knit and he was able to show us how to do it. After about 8 hours of practice that day I was finally able to get a few rows started and was getting a feel for the movements and how much tension I needed to use while holding the yarn.

After moving I worked on my starter piece intermittently over the next few weeks because I moved to Korea, had to get use to a new job, exploring my new city, and working on other grad school classes. I was finally able to finish my starter piece which is half a scarf. I may use it to practice embroidering on yarn as Future suggested. Earlier this week I started working on another scarf which I completed this week.
Things I have learned while doing this.
1.     People will stare at a guy knitting.
2.     Knitting is a great meditative practice. I can let my mind wander or go blank and focus on the movements of my hand, or I can use the time to plan and think.
3.     I found an art that I want to keep exploring and learning new patterns and techniques.
4.     I feel proud to have created something beautiful with my own hands.


I am currently working on another scarf, this time with a smaller yarn. After starting on the smaller yarn, I know that I like the chunkier yarn and want to work with that primarily. I also want to work with thread and other textile materials in the future. I also want to try my hand at knitting a blanket and knitting sweaters and hats and other items with yarn. I plan and doing more scarves and giving them to family and friends.